How To Install Llama 3.1 and 3.2 Locally on Windows (Short version)

LLaMA, developed by Meta AI Research, is a highly powerful and flexible open-source language model. Initially released as LLaMA and Llama 2, this model offers scalable solutions for tasks like text generation, answering questions, and understanding natural language.
The latest models are Llama 3.1 and Llama 3.2. Llama 3.1 features the newest versions with 8 billion and 7 billion parameters, while Llama 3.2 introduces smaller models with 1 billion and 3 billion parameters. Additionally, Llama 3.2 includes vision models with 11 billion and 90 billion parameters, providing enhanced capabilities for multimodal tasks.
In this post, I’ll show you how to install Llama 3 on Windows, covering the requirements, installation steps, and how to test and use Llama.
System requirements for running Llama 3 on Windows
The smaller 8-billion-parameter models can run on most modern laptops and desktops with at least 8GB of RAM and a decent CPU. For the larger models, a system with 16GB to 24GB of RAM is recommended.
To use the massive 70-billion-parameter Llama 3 model, more powerful hardware is ideal—such as a desktop with 64GB of RAM or a dual Nvidia RTX 3090 graphics card setup.
While the smaller models will run smoothly on mid-range consumer hardware, high-end systems with faster memory and GPU acceleration will significantly boost performance when working with Llama 3’s models.
We have a special dedicated article discussing the hardware requirements for running the LLaMA model locally on a computer.
Setting Up Llama 3 Locally: Implementation and Model Files
In order to install Llama 3 locally on Windows you need the implementation of the model – a software that refers to the code that defines the structure and operations of the LLaMA model.
And for this software in order to produce any meaningful output, you’ll need to download the pretrained model file that contains the weights and parameters for the specific Llama variation you want to use.
The learned parameters (weights) are stored in a separate file and loaded into the model during runtime to enable it to perform inference or make predictions on new data. The combination of the implementation code and the loaded weights allows the model to function as intended and produce meaningful outputs.
Currently, there are a couple of Llama implementations available that offer users the convenience of running the AI model locally.
Install latest Python version (3.13)
Download the latest Python version (3.13) and save it on your desktop. Run the exe file to install Python.
Install PyTorch and CUDA Toolkit
In order to use your NVIDIA GPU when doing Llama 3 inference you need PyTorch along with the compatible CUDA 12.4 computer platform. PyTorch website has a convenient selector tool for building the actual install command, but for Python installed on Windows trough the official site, use this one – python -m pip install torch torchvision torchaudio --index-url https://download.pytorch.org/whl/cu124

Next step is to download and install the CUDA Toolkit version 12.4, matching the PyTorch compute platform. During installation you will be prompted to install NVIDIA Display Drivers, HD Audio drivers, and PhysX drivers – install them if they are newer version. If you have more recent drivers version, choose a custom installation with only CUDA components.
The download size of CUDA Toolkit version 12.4, is approximately 3GB.
Install LM Studio on Windows
In the realm of local Llama inference, LM Studio is quickly becoming a favored choice among Windows users, thanks to its remarkable blend of user-friendliness and powerful features.
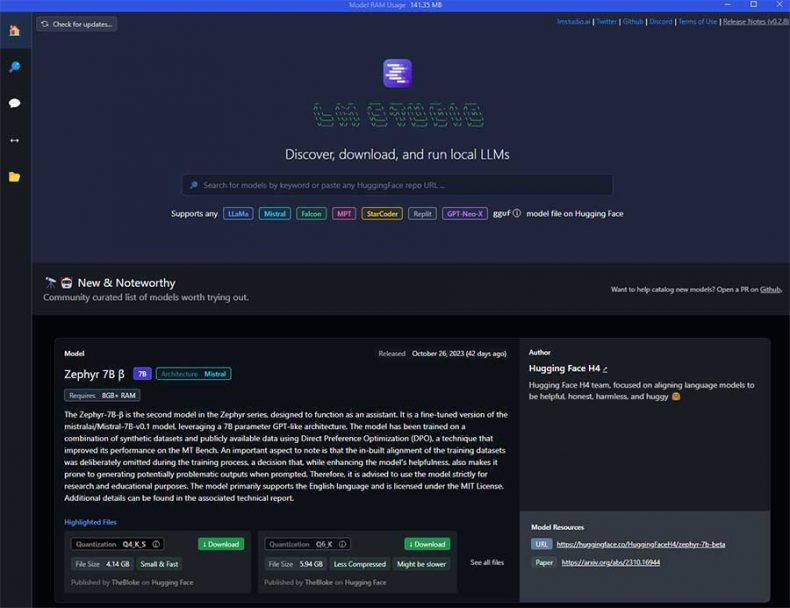
At the heart of LM Studio’s appeal is its intuitive chat interface, which simplifies the process of querying and interacting with LLMs. This interface is great especially for those who are new to LLMs or prefer a more straightforward user experience. Moreover, LM Studio is equipped with essential settings like:
- Model search and download.
- GPU offloading, a feature that splits the model between the GPU and RAM for faster inference.
- Predefined prompt formats for different models.
- Markdown formatting for code outputs.
- OpenAI compatible local server.
Underpinning all these features is the robust llama.cpp, that’s why you have to download the model in GGUF file format.
To install and run inference on LM Studio do the flowing:
- Visit the official LM Studio website.
- Download the software to your local machine.
- Run the Installer.
- After the installation is complete, open LM Studio.
- Use the search bar on the home screen to search, browse, and download any desired model.
- After the model is downloaded, click the chat icon on the left to navigate to chat screen.
- In the chat screen use the purple dropdown menu at the top to select the model.
- Use the right sidebar to setup the model prompt format, context length, model parameters, markdown or plaintext chat appearance.
- Load the model and chat with it.
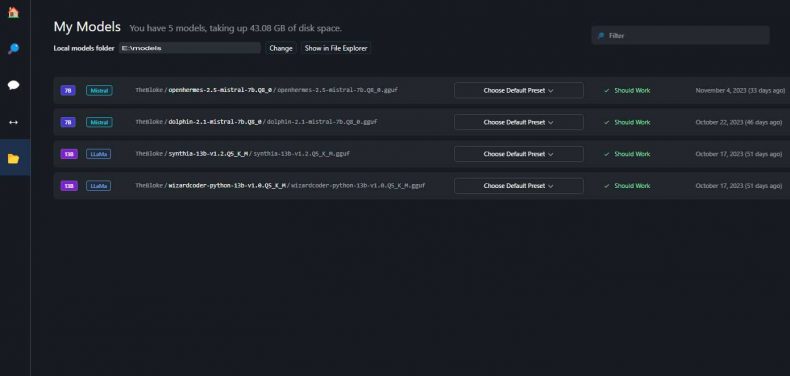
Using LM Studio with Pre-downloaded Models:
- On the left vertical menu of LM Studio, look for a file folder icon and click on it.
- In this section, find the “Local Models Folder” field.
- Click ‘Change‘ and navigate to the top folder where your local LLM files (GGUF) are stored.
- It’s important to ensure that the models are organized in the correct directory structure for LM Studio to recognize them.
- The models should be placed in a directory following this structure: /model-folder/hugging-face-repo/model-name.gguf.
- For example, if you’re using the 8-bit “TheBloke/OpenHermes-2.5-Mistral-7B-GGUF” model, it should be located in: /models-folder/TheBloke/openhermes-2.5-mistral-7b.Q8_0.gguf.
Optional: Installing llama.cpp for GPU and CPU inference
If you want a command line interface llama.cpp is a perfect solution. It is a port of Facebook’s LLaMA model in C/C++. llama.cpp is optimized for various platforms and architectures, such as Apple silicon, Metal, AVX, AVX2, AVX512, CUDA, MPI and more. It also supports 4-bit integer quantization. It is good for running the Llama 3 model on the CPU using minimal resources.
Llama.cpp runs in a simple command window (Windows PowerShell; Command Prompt) without convenient features and a user interface. It works only with GGML and GGUF converted weights. So, look for those in the file name.
The latest version of llama.cpp no longer supports GGML models. It now uses a new format called GGUF. So for llama.cpp, GGML is deprecated, though other clients/libraries may continue supporting it.
For now, to use GGML with llama.cpp you’ll need to downgrade to an older version and pre-GGUF binary release, or use a 3rd party client (KoboldCpp, LM Studio, text-generation-webui) that still supports GGML.
You can also convert GGML models yourself using the ggml_to_gguf.py script now included with llama.cpp.
The easiest way to install llama.cpp on Windows is to use a pre-built executable from their release page on Github.
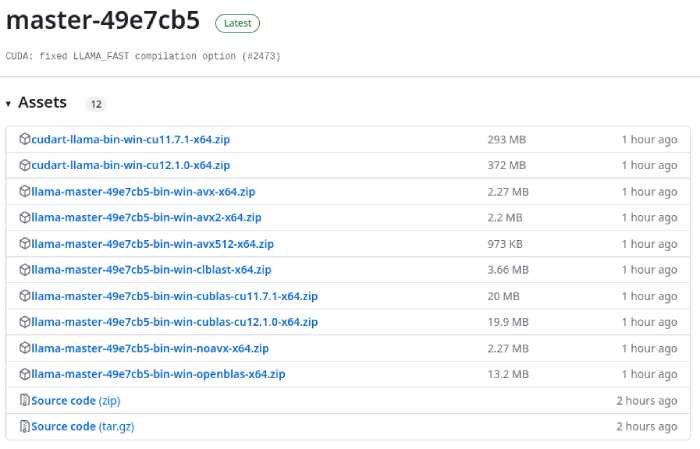
There are a couple of versions there you can choose from according to your hardware.
For pure CPU inference, choose the AVX release, which is typically AVX or AVX2, suitable for most processors. For GPU offloading, you have two options: cuBLAS for NVIDIA GPUs or clBLAS for AMD GPUs.
For example, offloading a 35 layer 7B parameter model using cuBLAS with RTX 3060 (12GB) can speed up the prompt evaluation time and inference time more than 3 times.
Installing AVX version
- Download the AVX/AVX2 zip file and extract its contents into a folder of your choice.
- Within the extracted folder, create a new folder named “models“
- Download the specific Llama 3 model weights (llama-3.1-8B-instruct) you want to use and place it inside the “models” folder.
- Open the Windows Command Prompt by pressing the Windows Key + R, typing “cmd,” and pressing “Enter.”
- Navigate to the main llama.cpp folder using the cd command.
- Run the following command in the Command Prompt:
main.exe -m .\models\8B\model_file_name.bin --in-prefix " [INST] " --in-suffix " [/INST]" -i -p "[INST] <<SYS>> You are a helpful, respectful, and honest assistant. <</SYS>> [/INST]" -ins --color
This command will start the llama.cpp AI model in interactive chat mode with the specified model and allow you to interact with it using the provided input.
Installing cuBLAS version for NVIDIA GPU
- Download the https://llama-master-eb542d3-bin-win-cublas-[version]-x64.zip file from llama.cpp releases and extract its contents into a folder of your choice.
- Download the same version cuBLAS drivers cudart-llama-bin-win-[version]-x64.zip and extract them in the llama.cpp main directory
- Update your NVIDIA drivers
- Within the extracted folder, create a new folder named “models.”
- Download the specific Llama-2 model (llama-3.1-8B-instruct) you want to use and place it inside the “models” folder.
- Open the Windows Command Prompt by pressing the Windows Key + R, typing “cmd,” and pressing “Enter.”
- Navigate to the main llama.cpp folder using the cd command.
- Run the following command in the Command Prompt:
main.exe -m .\models\8B\model_file_name.bin --in-prefix " [INST] " --in-suffix " [/INST]" -i -p "[INST] <<SYS>> You are a helpful, respectful, and honest assistant. <</SYS>> [/INST]" --n-gpu-layers 32 -ins --color
This command will start the llama.cpp AI model in interactive chat mode with the specified (in our case Llama-2-7B-Chat-GGML) model with 32 layers offloaded to the GPU. This means that with 7B you will have around 3700 MB of VRAM used and with 13B model 5800 MB VRAM used.
Use llama.cpp help (main.exe --help) to learn about other command line arguments.

Allan Witt
<p>Allan Witt is the co-founder and Editor-in-Chief of Hardware-Corner.net. Computers and the web have fascinated him since childhood. In 2011, he began training as an IT specialist at a mid-sized company while launching a tech blog on the side—quickly discovering a passion for writing about hardware and technology.</p> <p>After completing his training, Allan worked as a system administrator for two years. Alongside that, he started building and upgrading custom gaming PCs at a local hardware shop. What began as a part-time project grew into a full-time career. Today, his work also focuses on building and optimizing PC systems for local AI and LLM workloads, combining hands-on experience with a passion for making complex tech easy to understand.</p>4 Comments
Submit a Comment
Related
Desktops
Best GPUs for 600W and 650W PSU
A high-quality 500W PSU is typically sufficient to power GPUs like the Nvidia GeForce RTX 370 Ti or RTX 4070.
Guides
Dell Outlet and Dell Refurbished Guide
For cheap refurbished desktops, laptops, and workstations made by Dell, you have the option…
Guides
Dell OptiPlex 3020 vs 7020 vs 9020
Differences between the Dell OptiPlex 3020, 7020 and 9020 desktops.

I’m excited to try out LM Studio, but I’m also curious about llama.cpp. You mentioned it’s great for a command-line interface, but what are the key differences between the two? Which one should I prioritize, and why?
LM Studio and llama.cpp each bring something different to the table for running Llama models, and I wanted to gear this article toward beginners to make it easy to jump in. LM Studio is basically a user-friendly wrapper around llama.cpp, using it behind the scenes but with a smooth chat interface and lots of built-in features like setting model parameters, prompts, RAG, model downloading etc. It’s great for anyone who wants a straightforward, visual experience without needing to mess with the command line.
That said, I also wanted to include llama.cpp itself because it’s such a key project in the local LLM space. It’s bare-bones compared to LM Studio, but it’s what makes the whole setup possible and has inspired so many tools—like Ollama and LM Studio—that are making local AI more popular and accessible. If you’re a developer who likes control over parameters or wants to build Llama into a custom project, llama.cpp is perfect for that.
I’m want to use Llama 3 for home automation services. Are there any specific libraries or frameworks for building custom applications on top of the model?
I’m doing exactly this!
I built a personal voice notification service using Home Assistant and LM Studio. The new feature in LM Studio that lets you run a headless server is super useful for this setup. I created a Python script that collects data from Gmail, Google Calendar, and Home Assistant sensors, then sends it all to the LM Studio server along with a system prompt. The server responds with a summary of my daily tasks, plus a bit of extra info.
I use Home Assistant (via Flask) to grab this summary, generate audio with Edge TTS, and send it to my Wi-Fi speaker. It’s a fun project!
For libraries, I’m using the OpenAI Python library to handle LLM communication and Flask to run a local server for Home Assistant’s REST commands.