Private AI Assistant with Willow and a Local Large Language Model
I’ve been working on a cool project and thought I’d share a step-by-step guide on how to create AI assistant similar to Alexa, but with a twist – it’s private (no cloud services or APIs used), uses a Willow device (ESP32-S3-BOX), and prompts a local large langue model to answer your questions. Hope this helps someone out there!
Unboxing and connecting the ESP32-S3-BOX
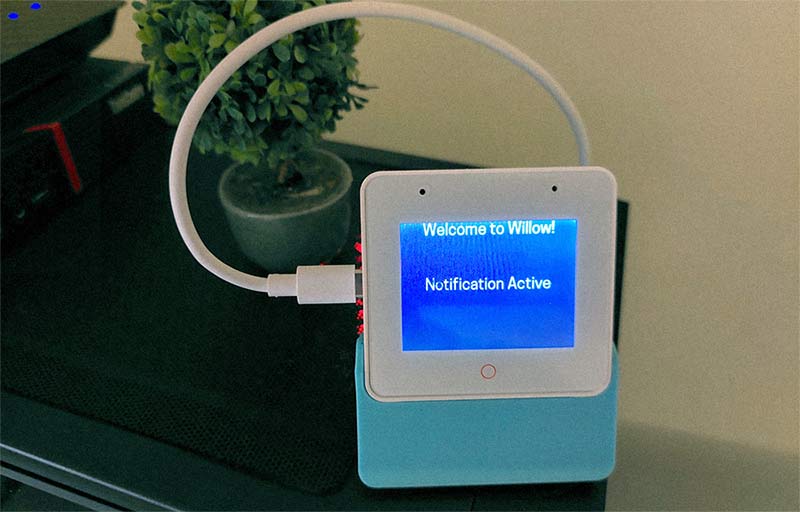
In order to build the whole AI assistant setup you need a ESP32-S3-BOX device. This is the hardware component that will act as the interface for your AI assistant. It will listen for your commands and send them to large langue model for answers.
Start by unboxing and connecting your ESP32-S3-BOX to the power with the USB-C cable.
Run Willow Application Server (WAS)
In order to configure the Willow device you need the application server – WAS. The software for the ESP32-S3-BOX and the application server are crated by Tavera (Kristian Kielhofner). You can find more about them on their GitHub page.
I’ve installed both the Willow Application Server (WAS) and Willow Inference Server (WIS) on my Windows 11 desktop with WSL 2, primarily because of my RTX 3060 12GB GPU. Most of you might have a similar setup. If you have different machines for WAS and WIS, remember to set their IPs accordingly.
For running the Willow Application Server, open your WSL or Linux terminal and execute the following command. Use sudo if Docker requires elevated privileges:
docker run --detach --name=willow-application-server --pull=always --network=host --restart=unless-stopped --volume=was-storage:/app/storage ghcr.io/toverainc/willow-application-serverSet Windows Defender rules and forward ports on WSL 2
If you’re using WSL 2 on a Windows desktop, port forwarding is necessary due to the switch from a bridged network adapter to a Hyper-V virtual network adapter in WSL 2. This change complicates accessing network resources under WSL 2.
Here’s how to set it up a script that forwards the necessary ports to WSL and makes inbound and outbound Window Defender rules:
Open a text editor of your choice and paste this PowerShell script and save it as wsl-port-forward.ps1:
$remoteport = bash.exe -c "ifconfig eth0 | grep 'inet '"
$found = $remoteport -match '\d{1,3}\.\d{1,3}\.\d{1,3}\.\d{1,3}';

if( $found ){
  $remoteport = $matches[0];
} else{
  echo "The Script Exited, the ip address of WSL 2 cannot be found";
  exit;
}

#[Ports]

#All the ports you want to forward separated by coma
$ports=@(80,443,8502,19000,1883,12101,8501,8443,3478,8080);


#[Static ip]
#You can change the addr to your ip config to listen to a specific address
$addr='0.0.0.0';
$ports_a = $ports -join ",";


#Remove Firewall Exception Rules
iex "Remove-NetFireWallRule -DisplayName 'WSL 2 Firewall Unlock' ";

#adding Exception Rules for inbound and outbound Rules
iex "New-NetFireWallRule -DisplayName 'WSL 2 Firewall Unlock' -Direction Outbound -LocalPort $ports_a -Action Allow -Protocol TCP";
iex "New-NetFireWallRule -DisplayName 'WSL 2 Firewall Unlock' -Direction Inbound -LocalPort $ports_a -Action Allow -Protocol TCP";

for( $i = 0; $i -lt $ports.length; $i++ ){
  $port = $ports[$i];
  iex "netsh interface portproxy delete v4tov4 listenport=$port listenaddress=$addr";
  iex "netsh interface portproxy add v4tov4 listenport=$port listenaddress=$addr connectport=$port connectaddress=$remoteport";
}
Then do the following:
- Open WSL 2 and install
ifconfig–sudo apt updateand thensudo apt install net-tools - Restart WSL 2.
- Open PowerShell with admin rights
- Run the script
.\wsl-port-forward.ps1 - Don’t worry if you encounter some error messages on the first run; these should resolve on subsequent executions.
Setup WAS
Now that your WAS Docker is running and you all the ports forwarded (WSL 2), open your browser and navigate to http://your-pc-local-ip-address:8502/admin/config/ (avoid using localhost). For example in my setup I am using – http://192.168.1.150:8502/admin/config/. If everything is set up correctly, you should see the Willow Application Server web interface.
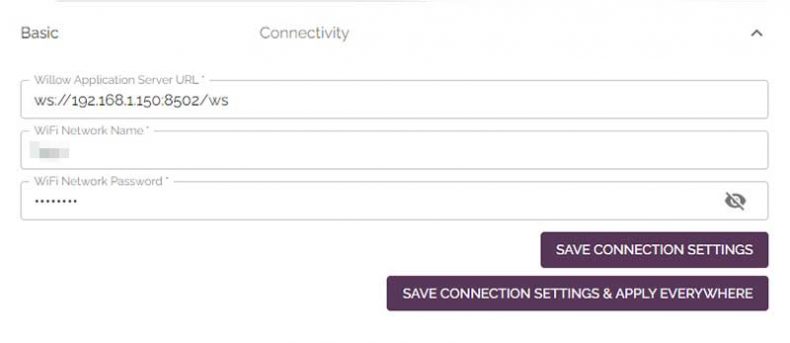
The connectivity screen in Willow’s web interface
In the connectivity window, set the Willow application server IP address and port as ws://your-local-ip-address-or-host:8502/ws. Then, enter your Wi-Fi network name and password and save these connection settings.
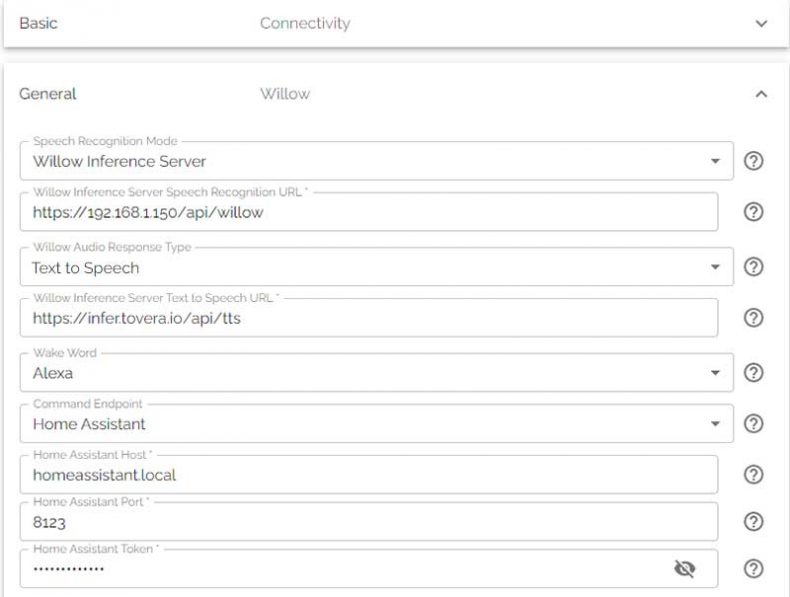
In the General tab, keep most of the settings as default but set Willow Audio Response Type to Text-to-Seach, Wake Word, adjust the time zone to your local time zone and set the audio to 100. Remember to save these settings.
Flashing the Device
Proceed to the top of the configuration page and click the blue link labeled ‘Willow Web Flasher‘. This will redirect you to the flasher page.
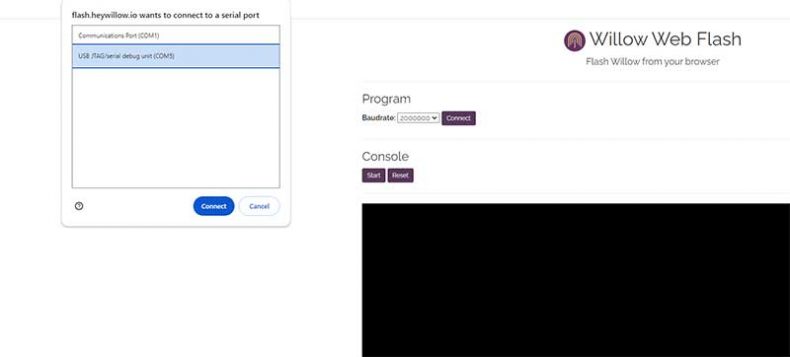
- Connect your device (in my case, ESP32-S3-BOX-3) to your desktop machine via USB.
- On the Willow flasher page, click ‘Connect’ and choose the USB JTAG/serial debug unit.
- Set your Wi-Fi name, password and Willow Application Server URL (ws://your-local-ip-address-or-host:8502/ws)
- Chose the ESP32-S3-BOX device
- Hit the Flash Willow button and wait for the process to complete.
- After flashing, the device will connect to your Wi-Fi network and WAS
- Go to WAS and confirm that the device is available under the Clients section.
You can now test the device by saying “Alexa” or “Hi, ESP“.
Installing Willow Inference Server (WIS)
Next, set up the Willow Inference Server.
The Willow Inference Server, or WIS for short, is this awesome, super-efficient server built for recognizing speech (ASR/STT) and turning speech into text (TTS). What’s cool about it is that it’s speech recognitions is super fast. I have never seen this on a non commercial device. It is targeting CUDA, but works with all kinds of hardware. Whether you’ve got something more budget-friendly like a Tesla P4 or GTX 1060, or a high-end RTX 4090, WIS has got you covered. And if you’re not using a GPU, no worries – it works just fine on a CPU too!
Here’s how to install WIS:
1. Clone the WIS Repo:
git clone https://github.com/toverainc/willow-inference-server.git && cd willow-inference-server2. On Arch Linux, ensure you have nvidia-container-toolkit (not nvidia-docker). Install it using:
yay -S libnvidia-container-tools libnvidia-container nvidia-container-toolkit docker-buildxIf you already have Docker, you can comment the Docker install line in ./deps/ubuntu.sh.
3. To install WIS prerequisites, execute:
./deps/ubuntu.sh4. If you have an NVIDIA GPU and want GPU acceleration, ensure you have NVIDIA Drivers 530 or higher installed. The WIS install script makes a check for nvidia-smi to install Docker image with GPU support. Type in the console nvidia-smi and see if generates output with your GPU info. In WSL 2 if nothing happens, add /usr/lib/wsl/lib to your PATH if nvidia-smi is located there:
export PATH="/usr/lib/wsl/lib/:$PATH"5. For WSL 2 users, if you run Docker with sudo, nvidia-smi won’t be available on your path, so add your user to the Docker group to run Docker commands without sudo:
sudo groupadd docker
sudo gpasswd -a $USER docker
Important: Log out and back in for the group membership to update, then restart Docker:
sudo service docker restartConfirm Docker is running without sudo using docker ps -a.
6. To install Willow Inference Server, run:
./utils.sh install7. Generate a self-signed TLS certificate (or use a real one at nginx/key.pem and nginx/cert.pem) using:
./utils.sh gen-cert [your hostname or ip]8. Start WIS with:
./utils.sh runConfirm that the Willow Inference Server is running by checking for startup completion messages in your console.
willow-inference-server-wis-1 | [2024-01-06 12:06:58 +0000] [92] [INFO] Willow Inference Server is ready for requests!
willow-inference-server-wis-1 | [2024-01-06 12:06:58 +0000] [92] [INFO] Application startup complete.
Configure Willow with Willow Application Server (WIS)
In the Willow application server’s configuration under General, configure Willow to use your newly installed WIS Docker instance for speech recognition and text-to-speech services:
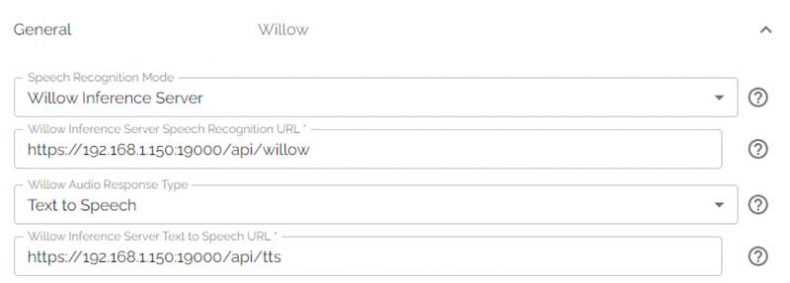
- Speech recognition endpoint: https://[your host/ip]:19000/api/willow
- Text-to-speech endpoint: https://[your host/ip]:19000/api/tts
Creating a Simple AI Assistant with Willow and a Local Large Language Model (LLM)
Now, to create an AI assistant similar to Alexa, we need to integrate Willow with a local LLM. This involves sending commands recognized by Willow to an LLM server. We’ll use FastAPI and LM Studio for this workflow.
FastAPI Command Endpoint
FastAPI will act as our broker. It will receive all transcribed messages from Willow and redirect them to the LM Studio server. FastAPI will then relay the LM Studio response to notify the Willow device to generate a voice response.
The prerequisites for FastAPI include having Python installed. Here’s the setup:
1. On you machine of choice (again I am using my local desktop PC and WSL 2) create a project directory:
mkdir simple-assistant2. Navigate inside the directory and create a Python virtual environment:
python -m venv venv3. Install FastAPI, Uvicorn, and Requests:\
pip install fastapi "uvicorn[standard]" requests4. Create a simple app that will accept requests from the Willow device, redirect them to LM Studio, and return the responses to Willow.
from fastapi import FastAPI
from pydantic import BaseModel
import requests
import urllib.parse

app = FastAPI()

#This class is maching tha schema of the date send by the Willow Application Server
class Command(BaseModel):
    language: str
    text: str

@app.post("/")
def read_root(command: Command):
    # Exctract the text you spoke to Willow device
    prompt = command.dict()['text']

    # Your LM Studio server IP
    llm_url = 'http://192.168.1.150:7777/v1/chat/completions'

    # LM Studio schema
    llm_request_data = {
        "messages": [
            {"role": "system", "content": "You are an intelligent assistant. You always provide well-reasoned answers that are both correct and helpful."},
            {"role": "user", "content": f"{prompt}"}
        ],
        "temperature": 0.7,
        "max_tokens": 123, # Lengthier LLM responses will generate error with WIS
        "stream": False
    }
    response = make_post_request(llm_url, llm_request_data)
    response = response.json()
    llm_response = response['choices'][0]['message']['content']

    # This section takes the LLM response and sends it to Willow
    encoded_llm_response = urllib.parse.quote_plus(llm_response)
    print(encoded_llm_response)

    willow_url = 'http://192.168.1.150:8502/api/client?action=notify'

    notify_data = {
        'cmd': 'notify',
        'data': {
            'backlight': True,
            'backlight_max': True,
            'repeat': 1,
            'volume': 100,
            'audio_url': f'https://192.168.1.150:19000/api/tts?text={encoded_llm_response}'
        }
    }
    make_post_request(willow_url, notify_data)
    # The response of our FastAPI endpoint will appear on Willow's screen. However if it takes more than 5 seconds, Willow will show Command response: Error on screen.
    return 'Response'

def make_post_request(url, data):

    headers = {
        'Content-Type': 'application/json',
    }

    return requests.post(url, json=data, headers=headers)
5. Start the Uvicorn server:
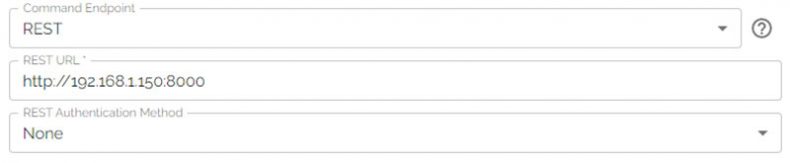
uvicorn main:app --reload --host 0.0.0.06. Go to Willow Application Server > Configuration > General tab and set the Command Endpoint to REST, REST URL to http://your-local-ip:8000, and the Rest Authentication Method to None then click Save Settings & Apply Everywhere button.
LM Studio Server
In the realm of local Llama inference, LM Studio is quickly becoming a favored choice among users, thanks to its remarkable blend of user-friendliness and powerful features. And it’s great for our use case because it has a built-in inference server.
To set up the LM Studio server follow these steps:
- Visit the official LM Studio website and download the software.
- Install LM Studio on your local machine.
- Open LM Studio and use the search bar to find and download a suitable 7B model, like OpenHerms 2.5.
- Set up the model prompt format, context length, model parameters, in the Server Model settings in the right sidebar.
- Set the server port to 7777 and start the server.
With all these components in place, you can now run your Alexa-like AI. Wake the Willow Device with “Alexa” (or “Hi ESP”) and ask a question. LM Studio should return the answer, and Willow will speak it out.
Keep in mind that if the response of the FastAPI endpoint (the call to the LLM server and his response) takes more than 5 seconds, Willow will show Command response: Error on screen, but still speak the LLM response when it’s ready.
I should mention that this is a hobby project. If the entire setup doesn’t function properly or if there are errors, it’s advisable to restart the WAS, WIS, and the Willow (ESP32-S3-BOX) device.
One of the issues I’m facing with this setup is that if the LLM’s answer is too lengthy, the Willow Inference Server generates an error. So, it it a good idea to restrict the max_tokens in your call to the LLM server. Additionally, if the Willow device’s response is long, it tends to produce a mumble speech at the end.
I hope this guide helps you set up your AI assistant. I will update this post regularly when there are new Willow functionalities available.

Allan Witt
<p>Allan Witt is the co-founder and Editor-in-Chief of Hardware-Corner.net. Computers and the web have fascinated him since childhood. In 2011, he began training as an IT specialist at a mid-sized company while launching a tech blog on the side—quickly discovering a passion for writing about hardware and technology.</p> <p>After completing his training, Allan worked as a system administrator for two years. Alongside that, he started building and upgrading custom gaming PCs at a local hardware shop. What began as a part-time project grew into a full-time career. Today, his work also focuses on building and optimizing PC systems for local AI and LLM workloads, combining hands-on experience with a passion for making complex tech easy to understand.</p>Related
Desktops
Best GPUs for 600W and 650W PSU
A high-quality 500W PSU is typically sufficient to power GPUs like the Nvidia GeForce RTX 370 Ti or RTX 4070.
Guides
Dell Outlet and Dell Refurbished Guide
For cheap refurbished desktops, laptops, and workstations made by Dell, you have the option…
Guides
Dell OptiPlex 3020 vs 7020 vs 9020
Differences between the Dell OptiPlex 3020, 7020 and 9020 desktops.